
A properly functioning dishwasher drain is essential for maintaining an efficient and clean kitchen environment. It ensures that wastewater is effectively removed, preventing clogs, leaks, and potential damage to your appliance or plumbing system. There are several common reasons why homeowners may need to address dishwasher drain installation.

These include replacing an outdated or damaged drain, installing a drain for a brand-new dishwasher, or resolving persistent drainage issues caused by blockages or improper installation.
This article serves as a comprehensive guide to help homeowners understand how to install dishwasher drain systems effectively and efficiently. By following the outlined steps, you can ensure proper functionality, avoid common issues, and extend the lifespan of your appliance.
Whether you’re an experienced DIY enthusiast or tackling this task for the first time, this guide will provide you with the essential knowledge and practical advice to complete the installation confidently.
Understanding the Dishwasher Drain System
How the Drain Works
The dishwasher drainage process involves several critical steps to ensure wastewater is effectively removed from the appliance.
After a wash cycle, the dishwasher’s pump pushes water out through the drain hose. This hose acts as a channel, directing the water to a designated drainage point, a kitchen sink drain, a garbage disposal, or a separate drain pipe. Gravity and water pressure work together to carry the wastewater away, ensuring the dishwasher is ready for the next use.
Key Components
Several components play a role in the dishwasher drain system. The drain hose is the primary conduit for wastewater and connects the dishwasher to the drainage point.
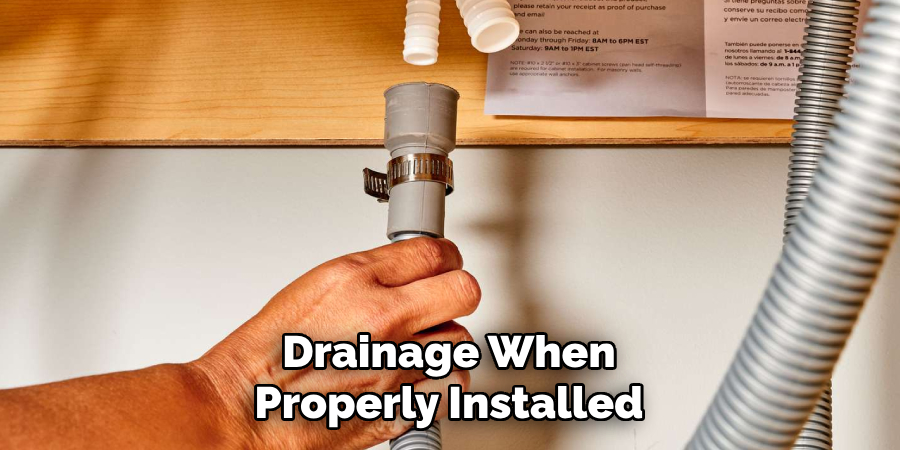
The drain pipe serves as the outlet pipeline where water is ultimately expelled. An air gap, if present, prevents dirty water from backing up into the dishwasher and plays a critical role in maintaining hygiene. Additionally, the disposal connection integrates with garbage disposals to facilitate seamless drainage when properly installed.
Common Issues
Even a well-designed dishwasher drain system can encounter issues. Clogs caused by food debris or grease can obstruct water flow, leading to drainage problems. Leaks might develop due to a damaged hose or poor connections.
Improper installation, such as incorrect hose positioning or missing air gaps, can further exacerbate these issues, affecting the dishwasher’s performance. Proper maintenance and attention to these components can mitigate such problems.
Preparing for Installation
Required Tools and Materials
Before starting the installation, gather the necessary tools and materials. You will need pliers, a screwdriver, a wrench, pipe tape, and the dishwasher drain hose. Additional optional items include hose clamps, an air gap, and a T-junction, depending on your setup. Having these tools ready ensures a smoother installation process and reduces the chances of delays.
Turning Off the Water Supply
Turning off the dishwasher’s water supply before beginning the installation process is crucial. This step prevents potential leaks or water damage during the setup. Locate the shut-off valve connected to the dishwasher and turn it off completely. Double-check that no water flows before proceeding further.
Assessing the Drainage Path
Take the time to assess the drainage path to ensure it is clear and adequate for properly installing the drain hose. Confirm there is enough space around the drainage area and identify where the hose will connect to the disposal or drain pipe. A well-organized drainage path minimizes the risk of improper function and prevents complications such as kinks or leaks in the hose.
Disconnecting the Old Drain System
Disconnecting the Drain Hose from the Dishwasher
Before removing the old drain system, ensure the dishwasher is fully disconnected from its power source to avoid any accidents. Start by locating the drain hose where it connects to the dishwasher’s drain port, typically at the back base of the appliance.
Depending on the model, the hose may be secured with either a clamp or a threaded connection. Use a screwdriver or wrench to loosen the clamp or unscrew the connection if applicable. Once loosened, gently pull the hose away from the port. Be prepared for a small amount of residual water to spill, so keep a towel or bucket nearby to catch any drips.
Disconnecting the Drain from the Sink or Disposal
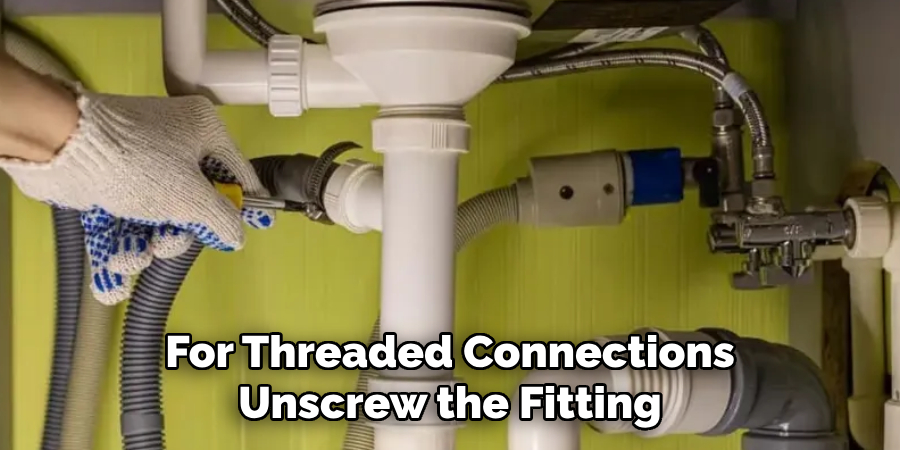
Next, locate the other end of the drain hose, which attaches to either the sink drain or the garbage disposal. If it is secured with a clamp, use pliers to loosen and slide the clamp away from the connection point. For threaded connections, unscrew the fitting.
Carefully disconnect the hose, ensuring you account for any water that may spill from the pipe. If the hose is tightly attached, avoid tugging too hard, as this could damage the surrounding components.
Inspecting the Drain
After completely detaching the drain hose, inspect both the hose and the connected plumbing. Check for signs of clogs, such as grease buildup, or visible damage, like cracks or splits.
If clogs or damage are found, address these issues before beginning the new installation to ensure the system functions smoothly and efficiently. This proactive inspection can prevent future problems during operation.
How to Install Dishwasher Drain: Installing Process
Attaching the New Hose to the Dishwasher
Begin by securing the new drain hose to the dishwasher’s drain port. Slide the hose onto the drain port firmly, pushing it as far as possible to create a solid connection. Once the hose is in place, use a hose clamp to secure it tightly around the port. Tighten the clamp with a screwdriver or pliers, being cautious not to overtighten, which could damage the hose or the fitting. Please double-check that the connection is snug and leak-free by gently tugging it to confirm the hose is securely attached.
Routing the Hose to the Sink or Disposal
Properly routing the drain hose is essential to ensure efficient water flow and prevent potential issues. Carefully route the hose from the dishwasher to the sink or garbage disposal, avoiding sharp bends or kinks that could restrict water flow.
Position the drain hose higher than the dishwasher for optimal performance, typically using a “high loop” that attaches the hose to the underside of your counter or a designated hook or clip. This setup helps prevent backflow, which can cause contaminated water to re-enter the dishwasher. Taking the time to route the hose correctly will ensure the system operates efficiently.
Connecting to the Sink or Disposal
Once the hose is routed, attach its other end to the sink drain or garbage disposal. If the connection uses a hose clamp, slide the clamp over the hose and then push the hose firmly onto the designated fitting. Once in place, move the clamp into position and tighten it securely with a screwdriver or pliers, ensuring a tight seal.
For threaded connections, align the hose and screw it onto the fitting, tightening it by hand and then finishing with a wrench if necessary.
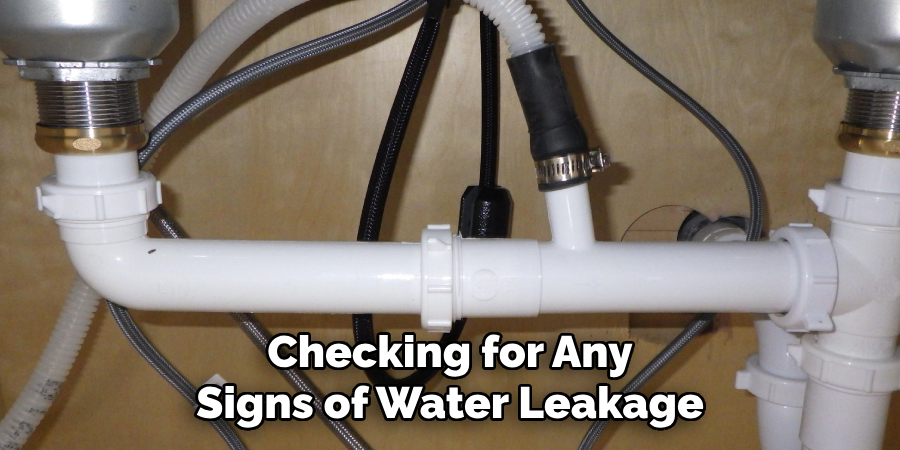
Inspect the connection to confirm it is sealed tightly to prevent leaks. Finally, test the installation by running a short cycle on the dishwasher and checking for any signs of water leakage.
Securing the Drain Hose and Testing the System
Securing the Drain Hose
Properly securing the drain hose is crucial to ensure the smooth operation of your dishwasher and prevent leaks. Double-check the placement of the hose, ensuring it follows the recommended routing path and is securely attached. Use clamps or screws as necessary to keep the hose firmly in position.
Neither the hose nor its connections should be loose or kinked, as this can lead to drainage issues or water leakage. Make sure the hose is stable and not under unnecessary tension to avoid future complications.
Testing for Leaks
Once the hose is secured, it’s time to test the installation. Turn on the dishwasher and carefully monitor the connections, especially around the drain fittings and clamps, to check for leaks. Look for any water pooling or dripping during the appliance’s operation. Running a short cycle will also allow you to verify that water is draining efficiently through the hose and exiting properly without blockages.
Adjustments
If you detect any issues, such as leaks or improper drainage, pause the cycle and make adjustments. Ensure clamps are tightened correctly, and the hose is positioned accurately. If an air gap is installed, confirm it is functioning properly and clear of obstructions. Repeat the test until the system operates seamlessly.
Troubleshooting Common Drain Issues
Leaking Connections
If you notice leaks around the drain hose connections, first inspect the clamps and fittings for looseness or wear. Tighten the clamps securely with a screwdriver, ensuring they grip the hose evenly. Check for cracks or splits in the hose and replace them if damaged. Additionally, verify the connections are properly aligned to prevent gaps where water might escape.
Clogs or Slow Draining
Clogs or slow drainage can result from food debris or residue buildup in the drain hose. To address this, disconnect and flush the hose with warm water. Use a flexible drain-cleaning brush to dislodge any blockages. It’s also essential to examine the dishwasher’s filter and drain pump for obstructions that could impede water flow. Regular cleaning can help prevent these issues from reoccurring.
Water Backflow
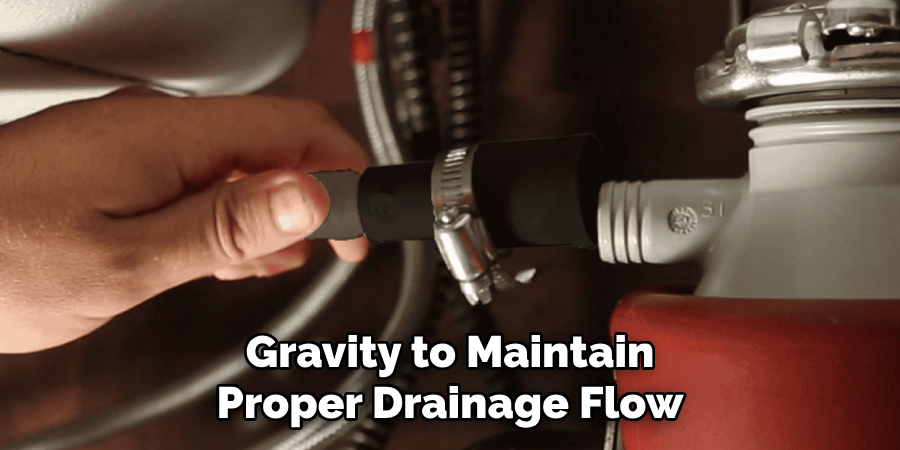
Water backflow occurs when wastewater re-enters the dishwasher. To address this, confirm the air gap is functioning correctly and blockage-free. If an air gap isn’t present, ensure the hose is installed with a high loop above the sink’s drain level. Elevating the hose helps prevent backflow by using gravity to maintain proper drainage flow.
Conclusion
Installing a dishwasher drain system correctly ensures optimal performance and prevents potential issues. Proper preparation, including gathering tools and checking compatibility, sets the stage for a smooth process. Following the step-by-step guide on how to install dishwasher drain components, such as securing connections and positioning the drain hose, is key to avoiding problems like leaks or clogs.
Once installed, thoroughly test the system and address any necessary adjustments. Regular maintenance, like cleaning the drain and inspecting for damage, will extend the system’s lifespan. By adhering to these tips, homeowners can enjoy a reliable and efficient dishwasher drain system for years to come.
Professional Focus
Angela Ervin, a former interior designer turned blogger, specializes in kitchen design and renovations. Through her website, she blends her passion for cooking with design expertise, sharing practical and creative ideas. Known for balancing functionality and beauty, Angela’s insightful content has made her a trusted voice in home design and lifestyle.
About the Author
Angela Ervin, an experienced interior designer and blogger, combines her passion for kitchen renovations with storytelling. Living in Petersburg with her family, she enjoys cooking and testing her projects firsthand. Known for her humor and relatable style, Angela shares creative, functional design insights through her content, making her a trusted voice in home design.
Education History
University: Virginia Commonwealth University
Degree: Bachelor of Fine Arts (BFA) in Interior Design
- Angela’s education at VCU focused on mastering core interior design principles, including spatial planning, color theory, materials selection, and sustainable design practices.
- She gained hands-on experience through studio projects and collaborative design exercises, which honed her ability to create functional and aesthetically pleasing environments.
- Her coursework also emphasized problem-solving and practical applications of design, preparing her for real-world projects like her self-directed kitchen renovations.
- The program’s strong foundation in both technical skills and creative expression shaped Angela’s ability to seamlessly integrate form and function in her work.