
Are you craving a delicious quesadilla but don’t want to eat it cold? Reheating quesadillas in the oven is a quick and easy way to enjoy them hot and melty again. Follow these simple steps to learn how to reheat quesadilla in oven.
Reheating quesadillas in the oven is one of the best methods to ensure they come out warm, crispy, and delicious, just like when they were freshly made. Unlike using a microwave, which can leave the quesadilla soggy, the oven provides even heat distribution that revives the flavors and maintains the texture of the tortilla and fillings.
Whether you have leftover quesadillas from a meal or a batch you’ve prepared in advance, the oven is a reliable way to enjoy them again with minimal effort.
What Are the Benefits of Reheating Quesadillas in Oven?
- Crispy Tortilla: When you reheat quesadillas in the oven, the tortilla becomes crispy again. This adds a satisfying crunch to every bite and prevents it from becoming soggy.
- Melty Cheese: The oven allows for even melting of cheese, ensuring that each bite is filled with gooey goodness.
- Uniform Heating: Unlike microwaves that can leave cold spots in your quesadilla, the oven provides consistent heat throughout to ensure thorough reheating.
- Easy Preparation: Reheating quesadillas in the oven is simple and requires minimal effort. Follow a few steps, and you’ll have a deliciously hot quesadilla in no time.
What Will You Need?
- Quesadilla: Of course, you’ll need a quesadilla to reheat! You can use any type of quesadilla – chicken, beef, vegetarian – the choice is yours.
- Baking Sheet or Pan: A baking sheet or pan is necessary to place your quesadilla in the oven. Make sure it’s large enough to fit your quesadilla and has sides to prevent any fillings from spilling out.
- Aluminum Foil: Aluminum foil will help keep your tortilla crispy by trapping in heat and preventing moisture from getting in.
Once you have all your ingredients ready, it’s time to start reheating your quesadilla in the oven.
8 Easy Steps on How to Reheat Quesadilla in Oven
Step 1. Preheat the Oven
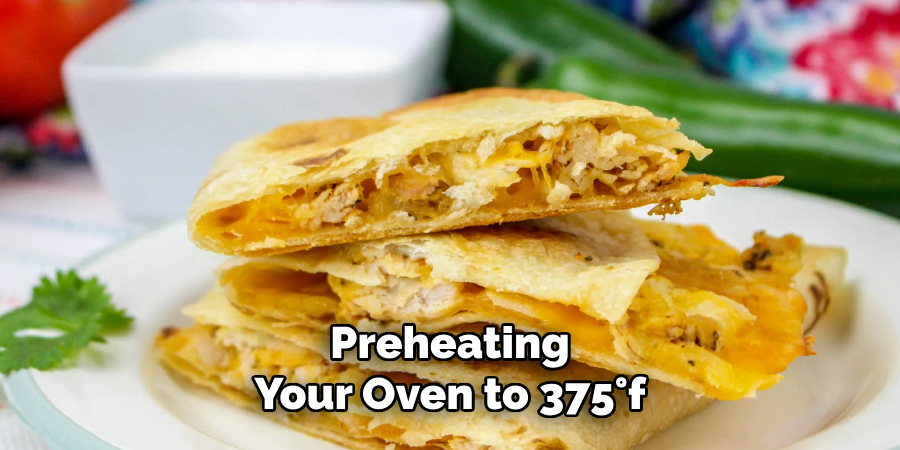
Start by preheating your oven to 375°F (190°C). This temperature is ideal to ensure that your quesadilla heats evenly without becoming too dry or burning. While heating the oven, you can prepare your quesadilla and the baking sheet. Preheating the oven is crucial, ensuring that the quesadilla begins reheating immediately once placed inside, leading to a better texture and flavor. Whether you’re working with a gas or electric oven, allow it to fully preheat before moving to the next step.
Step 2. Prepare the Baking Sheet
Take a baking sheet large enough to fit your quesadilla without bending or folding it comfortably. Line the baking sheet with aluminum foil or parchment paper to prevent sticking and minimize cleanup later. If you prefer a crisper texture, place a wire rack on the lined baking sheet to allow airflow underneath the quesadilla as it reheats. This ensures that the bottom doesn’t become soggy from the heat. If you’re reheating multiple quesadillas at once, leave enough space between them to ensure even heat distribution. Once prepared, set the baking sheet aside so it’s ready when the oven is fully preheated.
Step 3. Reheat the Quesadilla
Once the oven has fully preheated, place the prepared quesadilla on the baking sheet (or wire rack, if using) and transfer it to the oven. Heat the quesadilla for about 8 to 10 minutes, depending on its size and thickness. For best results, check on the quesadilla halfway through the process and flip it to ensure even heating on both sides. The tortilla should turn golden and slightly crispy, while the filling should become warm and gooey. Use caution when removing the baking sheet from the oven, as it will be hot.
Step 4. Serve and Enjoy
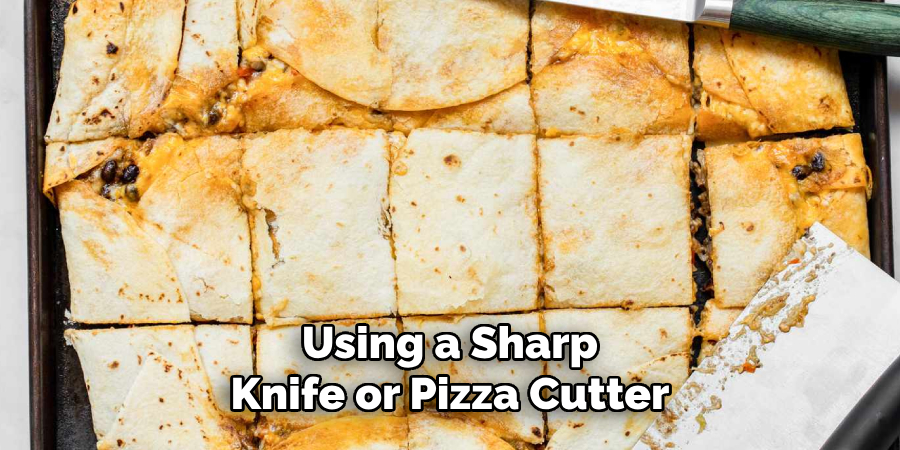
Once the quesadilla is heated to perfection, carefully remove it from the oven using oven mitts to avoid burns. Allow it to cool for a minute before slicing, as the filling will be hot. Using a sharp knife or pizza cutter, cut the quesadilla into equal wedges for easy serving. Consider pairing it with delicious accompaniments like sour cream, guacamole, or salsa for an extra touch. These sides enhance the flavor and provide a refreshing balance to the warm, cheesy filling. Serve the quesadilla immediately while it’s still warm and enjoy the delightful combination of textures and flavors. Whether it’s a quick snack or part of a larger meal, your quesadilla is sure to be a crowd-pleaser!
Step 5. Storage Tips
If you have leftover quesadillas, store them properly to maintain their quality. Allow the quesadillas to cool completely before wrapping them tightly in plastic or aluminum foil. Alternatively, place them in an airtight container. Store the quesadillas in the refrigerator for up to 3 days. To reheat, you can follow the methods outlined earlier to enjoy a fresh and delicious meal once more. Avoid consuming quesadillas that have been stored for too long to ensure food safety.
Step 6. Creative Serving Suggestions
Elevate your quesadilla experience by experimenting with different serving styles and accompaniments. Cut the quesadillas into bite-sized triangles for an easy-to-grab appetizer, perfect for parties or gatherings. Pair them with spicy rice, flavorful beans, or a tangy slaw for a hearty meal. To enhance their taste, you can also drizzle them with a zesty chipotle or cilantro-lime sauce. Don’t be afraid to explore unique fillings or toppings, such as adding grilled vegetables, roasted corn, or even a rich, creamy cheese sauce dollop. With creativity, quesadillas can transform into a versatile and customizable dish that suits any occasion.
Step 7. Tips for Perfect Quesadillas:
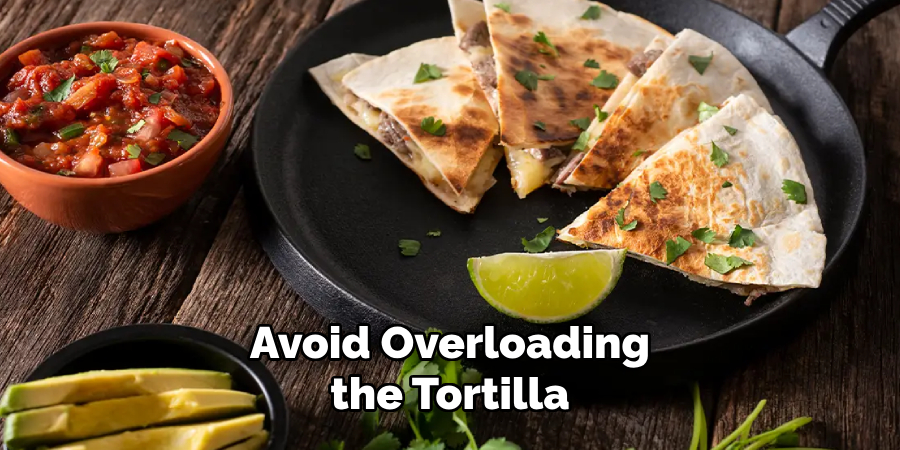
Achieving the perfect quesadilla requires attention to a few key details. First, ensure the tortilla is evenly browned and crisp by cooking it on medium heat and flipping it carefully. Avoid overloading the tortilla with fillings to prevent it from tearing or becoming soggy. Use freshly grated cheese, as it melts more smoothly than pre-shredded varieties. Additionally, pressing the quesadilla gently with a spatula while cooking can help meld the layers together for a cohesive texture. Properly seasoning the fillings and balancing flavors, such as adding a hint of acidity with lime juice or salsa, will further elevate the dish. Master these techniques for consistently delightful quesadillas
Step 8. Serving Suggestions
Once your quesadillas are perfectly cooked, serving them creatively can enhance the overall dining experience. Slice the quesadillas into wedges for easy handling and pair them with a selection of dips such as guacamole, sour cream, or a zesty salsa. For a well-rounded meal, serve alongside a fresh salad, seasoned rice, or beans. If hosting a gathering, consider presenting a quesadilla platter with various filling options to cater to different tastes. Garnish with chopped cilantro, a squeeze of lime, or even a drizzle of hot sauce to add a finishing touch. With thoughtful presentation, your quesadillas will be both visually appealing and deliciously satisfying.
By following these steps and tips, you can easily reheat quesadillas to perfection for a delightful meal.
5 Things You Should Avoid

- Reheating at Too High a Temperature: Setting the oven temperature too high can cause the quesadillas to burn or become overly crispy, ruining the texture. Always opt for a moderate heat, around 350°F (175°C), to ensure even reheating.
- Skipping the Lining for the Baking Sheet: Placing the quesadillas directly on a bare baking sheet can result in sticking or uneven heating. Use parchment paper or a lightly greased sheet to prevent this and make cleanup easier.
- Neglecting to Cover the Quesadilla: Moisture is essential to preventing dried-out quesadillas. Avoid reheating without a loose foil cover, which helps retain the cheese’s gooey texture and the tortilla’s soft yet crispy balance.
- Leaving the Quesadilla in Too Long: Overheating can make quesadillas harsh and unpleasant to eat. Keep an eye on the reheating time—generally, 10-15 minutes is sufficient for most quesadillas.
- Skipping a Check Midway Through: Reheating without checking progress can lead to uneven warming, with cold spots inside or edges becoming overdone. Halfway through the process, turn or adjust the quesadilla to ensure consistent heating.
What Type of Quesadilla Will You Make Next?
With the basic steps and tips in mind, the possibilities for creating delicious quesadillas are endless. You can experiment with different tortillas, such as whole wheat or corn, or try unique fillings like pulled pork, seafood, or a breakfast spin with scrambled eggs.
Furthermore, you can play with toppings like fresh herbs, diced tomatoes, or crushed tortilla chips for an extra crunch. Whether you prefer traditional flavors or want to put your own twist on this classic dish, reheating quesadillas is a convenient and tasty way to enjoy them anytime.
So go ahead and get creative – what type of quesadilla will you make next? Keep exploring and savoring the delicious world of quesadillas!
Conclusion
How to reheat quesadilla in oven is one of the most effective ways to restore its crispy texture and warm, gooey fillings.
You can achieve evenly heated and delicious results by following simple steps like preheating your oven, arranging the quesadillas on a baking sheet, and monitoring the heating time. The oven method preserves the flavors and prevents the quesadillas from becoming soggy, making it an ideal choice for those who prioritize quality and convenience.
Whether you’re reheating a quick snack or serving leftovers to guests, using the oven ensures your quesadillas taste as delightful as when they were first made.
Professional Focus
Angela Ervin, a former interior designer turned blogger, specializes in kitchen design and renovations. Through her website, she blends her passion for cooking with design expertise, sharing practical and creative ideas. Known for balancing functionality and beauty, Angela’s insightful content has made her a trusted voice in home design and lifestyle.
About the Author
Angela Ervin, an experienced interior designer and blogger, combines her passion for kitchen renovations with storytelling. Living in Petersburg with her family, she enjoys cooking and testing her projects firsthand. Known for her humor and relatable style, Angela shares creative, functional design insights through her content, making her a trusted voice in home design.
Education History
University: Virginia Commonwealth University
Degree: Bachelor of Fine Arts (BFA) in Interior Design
- Angela’s education at VCU focused on mastering core interior design principles, including spatial planning, color theory, materials selection, and sustainable design practices.
- She gained hands-on experience through studio projects and collaborative design exercises, which honed her ability to create functional and aesthetically pleasing environments.
- Her coursework also emphasized problem-solving and practical applications of design, preparing her for real-world projects like her self-directed kitchen renovations.
- The program’s strong foundation in both technical skills and creative expression shaped Angela’s ability to seamlessly integrate form and function in her work.