
A properly functioning oven igniter is essential for any gas oven to operate safely and efficiently. A faulty igniter can prevent the oven from heating properly, leaving you with undercooked meals or an appliance that won’t work at all.
Whether the problem is a weak spark, slow ignition, or no ignition, addressing the issue promptly is vital. Igniters play a critical role in lighting the gas and ensuring the oven maintains the desired temperature. If left unchecked, a defective igniter could compromise the oven’s performance or even create potential safety concerns.
This article aims to provide a comprehensive, step-by-step guide on diagnosing and replacing a faulty gas oven igniter. With the right tools and approach, this is a repair that many homeowners can tackle themselves. Read on to learn how to fix gas oven igniter issues and restore your oven’s functionality in no time.
Signs That the Gas Oven Igniter Needs Fixing
Oven Fails to Heat
The most obvious sign of a bad igniter is the oven not heating up when the burner is turned on. This typically occurs because the igniter can no longer generate the heat or spark required to ignite the gas. The oven stays cold without ignition, leaving your cooking plans in disarray.
Humming Sound but No Flame
If you hear the igniter humming but notice no flame, this clearly indicates a problem. The igniter might not be drawing enough current to open the gas valve, meaning there isn’t sufficient gas flow for ignition to occur. This situation can leave the oven unable to produce the flame it needs to function.
Igniter Glows but the Oven Doesn’t Light
A common issue is when the igniter glows yet fails to ignite the gas properly. The glow indicates partial functionality, but the insufficient strength of the igniter prevents it from reaching the necessary temperature for ignition, thus stalling the cooking process.
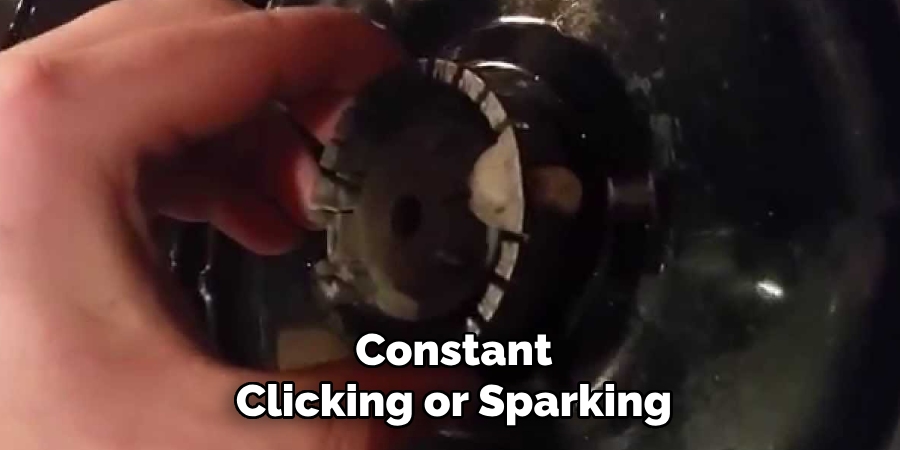
Repeated Clicking or Sparking Sounds
Constant clicking or sparking noises without successful ignition is another important sign. This often points to an igniter that is struggling to consistently spark the gas, signaling deterioration that requires immediate attention. Identifying these signs early can help address issues before further damage occurs.
Preparing for the Repair
Turn Off the Power and Gas Supply
Before beginning any repair, safety should be your top priority. Disconnect the oven from its power source by unplugging it or switching off the circuit breaker. Additionally, shut off the gas supply to the oven to prevent any potential gas leaks or accidents during the repair process.
Gather Tools and Materials
Having the right tools and materials on hand makes the process smoother and more efficient. For replacing the igniter, you will need the following items:
- A replacement igniter compatible with your oven model
- A screwdriver set
- A nut driver
- A multimeter (optional, for diagnosing electrical issues)
- Gloves and safety glasses to protect yourself during the repair
Safety First
Ensure that the oven is completely cool before you begin working on it. Performing repairs on a hot oven increases the risk of burns and other injuries. Always wear gloves and safety glasses to safeguard your hands and eyes from sharp components and debris within the oven. Taking these precautionary steps will set you up for a safe and efficient repair process.
Locating the Faulty Igniter
Accessing the Igniter Area
To begin, remove all oven racks to provide clear access to the interior. Depending on your oven model, you may also need to remove the oven bottom panel to reach the igniter. This panel usually lifts out or can be unscrewed with a screwdriver. The igniter is often located beneath the oven floor or within the burner assembly, so take your time to properly expose the area without forcing any components.
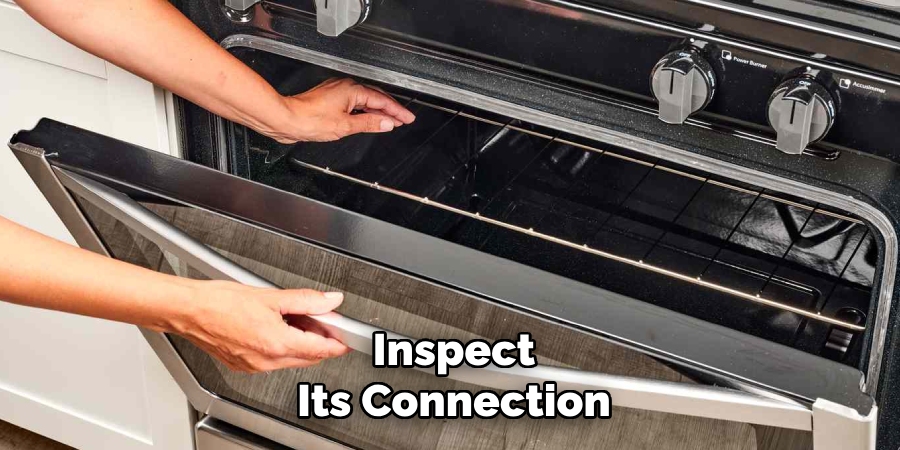
Inspect the Igniter
Once you’ve accessed the igniter, carefully examine it for any visible signs of damage. Common issues include cracks, burn marks, or discoloration on the igniter itself. Additionally, inspect its connection to the oven’s wiring for any loose attachments or damaged wires, as these could also indicate problems.
Test the Igniter (Optional)
For a more accurate diagnosis, consider testing the igniter with a multimeter. Set your multimeter to measure continuity and connect its probes to the igniter terminals. If the multimeter does not indicate continuity, this confirms that the igniter is faulty and needs to be replaced. Testing the igniter ensures you address the correct issue while avoiding unnecessary repairs.
Removing the Old Igniter
Disconnect the Power and Gas
Before proceeding, ensure your safety by unplugging the oven from its power source and turning off the gas supply. This step is vital to avoid electrical shocks or gas leaks during the removal process.
Remove the Igniter’s Cover (if applicable)
Some ovens have a protective cover or panel shielding the igniter. Use a screwdriver to detach this cover if necessary, taking care not to damage the surrounding components. Set the cover and any screws aside in a safe place for reassembly later.
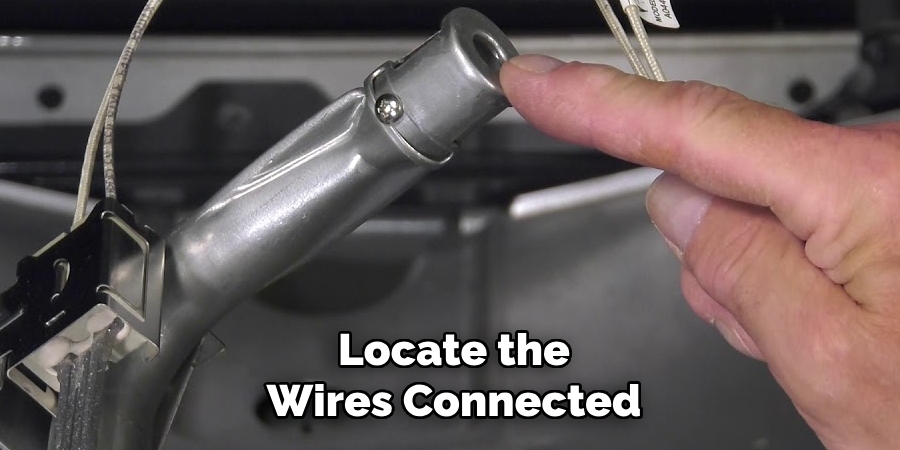
Disconnect the Igniter’s Wires
Locate the wires connected to the igniter and carefully disconnect them. Most igniters are attached via simple wire connectors or clips. Take note of how the wires are connected, as this will help ensure proper installation of the replacement igniter. If needed, take a photo of the wire connections for future reference.
Unscrew and Remove the Old Igniter
Use a screwdriver or nut driver to unscrew the fasteners securing the igniter to its mounting bracket or burner assembly. Once the screws are removed, gently lift the igniter out of its position. Handle the igniter with care to avoid damaging nearby parts or dropping debris into the oven. Set the old igniter aside, as it will no longer be in use. At this point, the oven is ready to install the new igniter.
How to Fix Gas Oven Igniter: Installing the New Igniter
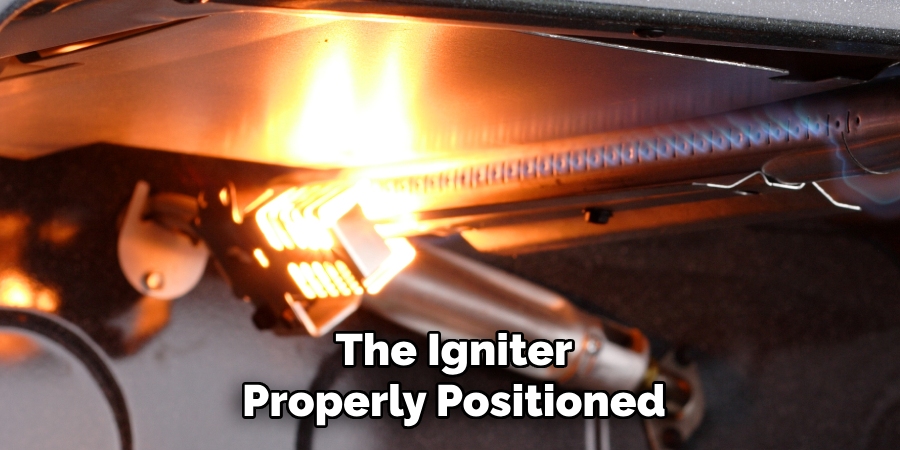
Position the New Igniter
Carefully insert the new igniter into the designated position in the oven. Ensure the igniter is properly aligned with its mounting location, as this will ensure optimal performance. Double-check that the igniter’s orientation matches the layout of the previous one to avoid any misalignment issues.
Reattach the Igniter’s Wires
Connect the wires to the new igniter by attaching them to the corresponding wire connectors or clips. Ensure the connections are clean, secure, and free of debris or corrosion.
A firm connection is crucial to prevent electrical issues and ensure the igniter functions correctly. If you documented the previous wire configuration, refer to your notes or photo during this step to confirm the correct placement of the connections.
Screw the Igniter into Place
With the igniter properly positioned and the wires securely reconnected, use a screwdriver or nut driver to reinstall the fasteners that hold the igniter to the burner assembly or mounting bracket. Ensure the igniter is securely fastened but avoid overtightening the screws, as this may damage the igniter or its mounting area. A snug, secure fit should suffice.
At this stage, the new igniter is installed and securely in place, making it ready for the next step in the oven repair process.
Reassembling the Oven and Testing the Repair
Reassemble the Oven
Begin by replacing any panels or covers that were removed earlier to access the igniter. Ensure that all screws and fasteners are tightened securely but not overtightened.
Reinstall the oven racks and any other parts that were taken out during the repair process. Take this opportunity to double-check that all components are properly aligned and that nothing is loose or out of place.
Turn On the Gas and Power
Once the oven is fully reassembled, restore the gas supply by ensuring the valve is set to the “on” position. Then, plug the oven back into the electrical outlet. Confirm that the gas and power connections are secure and that there are no signs of leaks or issues before proceeding to test the oven.
Test the Oven
Finally, set the oven to a standard baking temperature, such as 350°F, and observe its functionality. Check if the igniter glows and successfully lights the gas. Monitor the oven to ensure it heats up properly and the flame ignites without flickering or going out. If everything operates smoothly, the repair is complete. If issues persist, recheck the earlier steps or consult a professional for assistance.
Troubleshooting Common Issues
Igniter Still Not Lighting the Gas
If the igniter fails to light the gas, double-check the wire connections to ensure they are secure and correctly installed. Additionally, confirm that the igniter is appropriately positioned and close enough to the burner.
If the igniter glows but still does not light the gas, the problem may lie with the gas valve or other internal components, such as clogged burner ports. Inspecting and cleaning these parts or replacing the gas valve might be necessary if it is malfunctioning.

Oven Not Reaching Desired Temperature
When the igniter glows but the oven does not reach the desired temperature, this could point to a defective thermostat or a gas valve that is not regulating the flow correctly. A faulty thermostat may be sending inaccurate temperature readings to the oven’s control system, preventing it from efficiently heating to the set temperature. Replacing the thermostat or gas valve may resolve the issue.
Repeated Clicking Without Ignition
If the igniter clicks repeatedly but fails to ignite the gas, it may not be drawing sufficient power. Check the power connections and ensure the igniter is in good condition. If the issue persists, the oven’s control board may be faulty and in need of inspection or replacement.
Conclusion
Fixing a faulty gas oven igniter is straightforward when approaching with the correct steps and safety precautions. To pinpoint the issue, start by identifying the symptoms, such as the igniter failing to glow or the oven not reaching the desired temperature.
Always test the igniter with a multimeter to ensure it is the actual source of the problem before removing or replacing it. This step saves time and avoids unnecessary replacements. If the igniter proves faulty, follow manufacturer guidelines to install a replacement part securely.
If you’re unsure about any step or the problem persists despite replacing the igniter, it’s advisable to consult a professional to avoid further complications. With the right tools, patience, and attention to detail, you can master the process of how to fix gas oven igniter issues, restoring your appliance to full working order and ensuring safe, effortless meal preparation.
Professional Focus
Angela Ervin, a former interior designer turned blogger, specializes in kitchen design and renovations. Through her website, she blends her passion for cooking with design expertise, sharing practical and creative ideas. Known for balancing functionality and beauty, Angela’s insightful content has made her a trusted voice in home design and lifestyle.
About the Author
Angela Ervin, an experienced interior designer and blogger, combines her passion for kitchen renovations with storytelling. Living in Petersburg with her family, she enjoys cooking and testing her projects firsthand. Known for her humor and relatable style, Angela shares creative, functional design insights through her content, making her a trusted voice in home design.
Education History
University: Virginia Commonwealth University
Degree: Bachelor of Fine Arts (BFA) in Interior Design
- Angela’s education at VCU focused on mastering core interior design principles, including spatial planning, color theory, materials selection, and sustainable design practices.
- She gained hands-on experience through studio projects and collaborative design exercises, which honed her ability to create functional and aesthetically pleasing environments.
- Her coursework also emphasized problem-solving and practical applications of design, preparing her for real-world projects like her self-directed kitchen renovations.
- The program’s strong foundation in both technical skills and creative expression shaped Angela’s ability to seamlessly integrate form and function in her work.