
Installing a dishwasher bracket is an essential step to ensure your dishwasher remains securely in place during operation. Whether you’re replacing an old bracket or installing a new dishwasher altogether, this guide on how to install a dishwasher bracket will walk you through the process with clear and easy-to-follow instructions.

By completing this task correctly, you can prevent unnecessary movement, reduce noise, and extend the life of your appliance.
Why Do You Need a Dishwasher Bracket?
Before we dive into the steps of installing a dishwasher bracket, it’s essential to understand why this small piece of hardware is crucial. A dishwasher bracket, also known as a mounting or installation bracket, serves as a support system for your appliance. It helps to distribute the weight and secure the dishwasher in place, preventing any potential movement or displacement during use.
It’s especially important to have a dishwasher bracket if you have a built-in dishwasher that is integrated into your kitchen cabinets. Without proper support, the weight of the appliance can cause it to sag or even fall out, leading to potential damage and safety hazards.
What You Will Need
To successfully install a dishwasher bracket, you will need the following tools and materials:
A New Dishwasher Bracket (if You Don’t Already Have One)
If you are installing a new dishwasher, it may come with its bracket. However, if you’re replacing an old bracket or adding one for the first time, you will need to purchase one separately.
A Drill and Appropriate Drill Bit
You will need a drill to make a hole(s) in your cabinet or wall for the bracket to be attached. The size of the drill bit should match the screws that come with your bracket.
Screws
Your dishwasher bracket will come with screws, but if you’re using an old one, make sure they are appropriate and not damaged.
Level
A level is necessary to ensure that your dishwasher is installed evenly and correctly.
Pencil
You will need a pencil to mark where you want to place the bracket on your cabinet or wall.
10 Step-by-step Guides on How to Install a Dishwasher Bracket
Step 1: Turn Off the Power and Water Supply
Before starting the installation process, it’s crucial to ensure your safety by turning off the power and water supply to the dishwasher. Locate the circuit breaker and switch off the electricity connected to the dishwasher. Next, find the water shut-off valve under your sink or near the dishwasher and turn it off to stop the water flow.

Double-check both the power and water supply are completely off before proceeding to the next step. This precaution will help prevent accidents like electrical shocks or water leaks during installation.
Step 2: Prepare the Dishwasher Bracket
Unpack the dishwasher bracket and review the included instructions to ensure you understand how it should be positioned and installed. If the bracket is adjustable, make any necessary adjustments to fit your specific dishwasher model. Lay out the bracket and the screws so they’re easily accessible during installation.
Check the condition of the bracket and screws to ensure there are no defects, such as bent metal or stripped threads, that could affect the installation process. Having the bracket ready and prepared will streamline the rest of the installation steps.
Step 3: Locate the Mounting Locations
To determine where to install the dishwasher bracket, you need to locate where the dishwasher will be mounted on the cabinet or wall. Some dishwashers come with pre-drilled holes for easy installation, but if not, you will have to measure and mark them yourself.
Measure the distance between each mounting location and make sure they are even to ensure proper weight distribution. Use a level to confirm that they are both horizontally and vertically aligned before marking their positions with a pencil.
Step 4: Drill Holes
Using your drill and appropriate-sized drill bit, carefully drill holes into the marked locations on your cabinet or wall. Make sure not to drill too deep to avoid damaging the other side.

If you are using an existing bracket, make sure the holes line up with the ones on the bracket. If not, adjust and mark new hole locations before drilling.
Step 5: Attach the Bracket
Once the holes are drilled, position the dishwasher bracket over the drilled holes, ensuring it aligns perfectly with the markings. Hold the bracket firmly in place and insert the screws through the bracket into the holes. Using your drill or a screwdriver, securely tighten each screw, but be careful not to overtighten as this could strip the screws or damage the bracket.
Double-check that the bracket is mounted securely and does not wobble. If it feels loose, you may need to tighten the screws further or verify that the holes were drilled accurately. A properly attached bracket is essential for providing the necessary stability for the dishwasher.
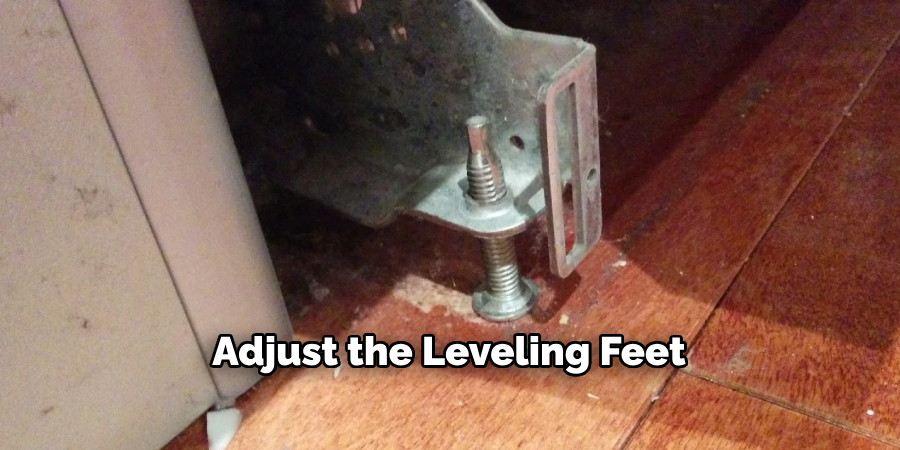
Step 6: Slide the Dishwasher Into Place
With the bracket securely installed, you can now carefully slide the dishwasher into its designated spot. If necessary, adjust the leveling feet on the bottom of the dishwasher to ensure they are even and level with your countertop. Once in place, check that it is properly aligned with your cabinet and make any adjustments as needed.
If you are replacing an old dishwasher, you may need to attach the water supply and drain hoses before sliding it in.
Step 7: Secure the Dishwasher to the Bracket
Using additional screws included with your bracket or ones from your previous installation, secure the dishwasher onto the bracket. These screws should be inserted through holes on the top of the dishwasher and into corresponding holes on the bracket.
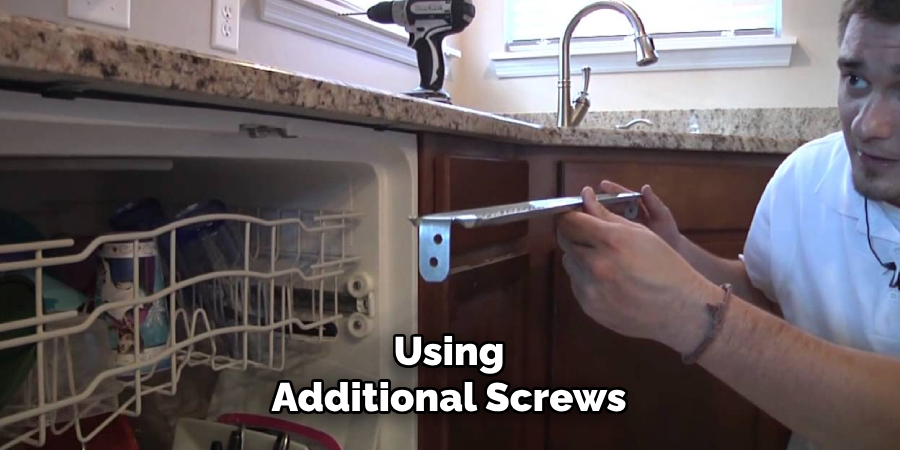
Make sure not to overtighten these screws as they are meant to keep the dishwasher in place without placing too much pressure on it.
Step 8: Reattach Electrical and Water Supply
Now that your dishwasher is securely mounted, you can reconnect its power and water supply. Turn on both the electricity and water valves to restore power and flow.
Double-check that all connections are secure and there are no leaks before moving forward.
Step 9: Level the Dishwasher
Once the dishwasher is fully installed, use a level to ensure that it is perfectly horizontal and vertical. If adjustments need to be made, use the leveling feet on the bottom of the dishwasher to even it out. This step is crucial for proper function and preventing any leaks or damage in the future.
It’s also recommended that a test cycle be run to check for any further adjustments that may need to be made.
Step 10: Secure the Dishwasher in Place
To provide additional stability and prevent any movement or tilting of the dishwasher, use screws or brackets to secure it further. Depending on your specific dishwasher model, this step may not be necessary, but it can help with longevity and prevent future issues.
Following these steps will ensure a successful and secure installation of your dishwasher bracket. Remember to always prioritize how to install a dishwasher bracket safety by turning off power and water supplies before starting any installation process. If you encounter any difficulties, consult the manufacturer’s instructions or seek professional assistance. Happy dishwashing!
Frequently Asked Questions
Q1: Do I Need a Dishwasher Bracket for My Installation?
A: It is highly recommended to use a dishwasher bracket for proper stability and support, especially if the dishwasher is being installed under a countertop. However, some dishwasher models do not require a bracket for installation. Check the manufacturer’s instructions or consult a professional for more information.
Q2: Can I Use Any Bracket for My Dishwasher?
A: It is essential to use a bracket specifically designed for dishwashers to ensure proper fit and support. Using other types of brackets may compromise the stability and function of your dishwasher.
Q3: How Many Screws Do I Need to Secure the Dishwasher Bracket?
A: The number of screws needed will vary depending on the size and model of your dishwasher bracket. Refer to the manufacturer’s instructions for specific requirements. In general, it is recommended to use at least two screws per side for proper support.
Q4: Is It Necessary to Level the Dishwasher After Installation?
A: Yes, it is crucial to level the dishwasher after installation to ensure proper function and to prevent any leaks or damage. Use a level and adjust the leveling feet on the bottom of the dishwasher as needed.
Conclusion
Installing a dishwasher bracket may seem like a daunting task, but by following the outlined steps on how to install a dishwasher bracket, you can ensure a secure and stable installation. Proper alignment, leveling, and securing are crucial for the safe and efficient operation of your dishwasher.
Remember to always refer to the manufacturer’s guidelines for specific requirements and prioritize safety throughout the process. With careful attention to detail, your dishwasher will be ready to provide years of reliable service, making your kitchen tasks easier and more convenient.
Professional Focus
Angela Ervin, a former interior designer turned blogger, specializes in kitchen design and renovations. Through her website, she blends her passion for cooking with design expertise, sharing practical and creative ideas. Known for balancing functionality and beauty, Angela’s insightful content has made her a trusted voice in home design and lifestyle.
About the Author
Angela Ervin, an experienced interior designer and blogger, combines her passion for kitchen renovations with storytelling. Living in Petersburg with her family, she enjoys cooking and testing her projects firsthand. Known for her humor and relatable style, Angela shares creative, functional design insights through her content, making her a trusted voice in home design.
Education History
University: Virginia Commonwealth University
Degree: Bachelor of Fine Arts (BFA) in Interior Design
- Angela’s education at VCU focused on mastering core interior design principles, including spatial planning, color theory, materials selection, and sustainable design practices.
- She gained hands-on experience through studio projects and collaborative design exercises, which honed her ability to create functional and aesthetically pleasing environments.
- Her coursework also emphasized problem-solving and practical applications of design, preparing her for real-world projects like her self-directed kitchen renovations.
- The program’s strong foundation in both technical skills and creative expression shaped Angela’s ability to seamlessly integrate form and function in her work.