
Moving an oven can seem like a daunting task, but with the right preparation and techniques, it can be done safely and efficiently. Whether you are relocating to a new home or simply rearranging your kitchen, understanding the steps involved is essential to avoid damage to your appliance, floor, or walls.
This guide on how to move an oven will provide clear instructions and helpful tips to ensure the process goes smoothly and hassle-free.
Why Do You Need to Move Your Oven?
There are several reasons why you may need to move your oven. Some common situations include:
- Relocating to a new home
- Renovating your kitchen
- Cleaning behind or under the oven
- Replacing an old or broken oven
Whatever the reason may be, it is important to follow proper procedures when moving your oven to avoid any accidents or damage.
10 Step-by-step Guidelines on How to Move an Oven
Step 1: Gather the Necessary Tools and Supplies
To move your oven safely, you will need a few essential tools and supplies:
- Work Gloves
- Moving Dolly or Hand Truck
- Furniture Sliders
- Packing Tape
- Bubble Wrap or Moving Blankets
Having these items on hand will make the moving process easier and safer. Ensure that the dolly or hand truck is capable of carrying heavy loads, as ovens can be quite heavy.
Step 2: Measure the Space
Before you begin moving your oven, take accurate measurements of both the appliance and the space where it will be relocated. Use a tape measure to determine the oven’s width, height, and depth, and ensure the new spot accommodates these dimensions with some additional room for ventilation.

If there are doorways, hallways, or tight corners along the moving path, measure these as well to confirm the oven will fit through without issues. Proper measurements will help you avoid unnecessary obstacles and ensure a smooth transition.
Step 2: Disconnect Power and Gas Supply (If Applicable)
If your oven is electric, unplug it from the power outlet before anything else. If it runs on gas, turn off the main supply valve to cut off any gas flow. In either case, it is important to disconnect the appliance from any power sources to avoid electric shocks or gas leaks during the move.
However, if you are not comfortable handling gas connections, it is recommended that you seek professional help.
Step 3: Remove the Oven Racks
Before moving the oven, remove all internal components, including the oven racks, trays, or broiler pans. These loose items can shift during the moving process and cause damage to the interior of the oven or become a safety hazard.
Carefully slide the racks out of the oven and set them aside. For added protection, wrap the racks in bubble wrap or moving blankets to prevent scratches or dents while they are in transit. Removing the internal parts will also lighten the oven, making it easier to move.
Step 4: Secure the Oven Door
To prevent the oven door from swinging open during the move, it is essential to secure it properly. Start by closing the door completely and ensuring it is latched. Then, use packing tape or a strong strap to hold the door firmly in place.
Wrap the tape around the door and body of the oven, making sure it is tight enough to keep the door shut but not so tight that it damages the surface. This precaution will not only protect the door from accidental damage but also make handling the oven safer.
Step 5: Prepare the Floor
When moving your oven, it is crucial to protect your floors from scratches or dents. Lay down a piece of cardboard or thick cloth on the floor before starting the move. Alternatively, you can also use furniture sliders if you have them available. These will make it easier to slide and maneuver the oven without causing any damage to your floors.

You may also want to consider removing any obstacles or potential tripping hazards from the moving path to ensure a smooth and safe move.
Step 6: Carefully Move the Oven onto the Dolly
With the preparations complete, it’s time to transfer the oven onto the dolly or hand truck. Start by enlisting the help of another person, as ovens are typically heavy and awkward to lift alone. Grip the oven firmly from both sides, using proper lifting techniques to avoid straining your back or causing injury. Lift the oven just enough to clear any obstacles and carefully slide it onto the dolly.
Once the oven is positioned, ensure it is balanced securely on the dolly platform. Use straps or moving tape to fasten the oven to the dolly, preventing it from shifting or falling during transport. Double-check that the dolly can support the weight and is stable before proceeding with the move. Always maintain a firm grip on the dolly handles and carefully tilt it back to begin moving the oven to its destination.
Step 7: Transport the Oven to Its New Location
Using the dolly or hand truck, slowly and carefully move the oven to its new location. Avoid any sudden movements or jerks that may cause the oven to shift or fall off the dolly.
If you encounter obstacles along the way, take your time and maneuver around them safely. It is recommended to have someone walk alongside the dolly, providing extra support and assistance if needed.
Step 8: Unload the Oven from the Dolly
Once you have safely transported the oven to its new location, the next step is to carefully unload it from the dolly or hand truck. Begin by positioning the dolly as close as possible to the final spot where the oven will be placed. Make sure the area is clear, and ensure there is enough space to safely set down the oven.
With the help of another person, firmly grip the oven from both sides while keeping your back straight and lifting with your legs to prevent any injuries. Slowly guide the oven off the dolly, lowering it gently to the floor. Avoid any sudden movements to minimize the risk of dropping or damaging the appliance.
Step 9: Reinstall Oven Racks and Components
Once the oven has been successfully moved to its new location, it’s time to reinstall all the internal components that were removed earlier. Carefully slide the oven racks, trays, or broiler pans back into their original positions. Make sure they are secure and properly fitted before using the oven again.

Otherwise, you may risk damaging the oven or your food while cooking.
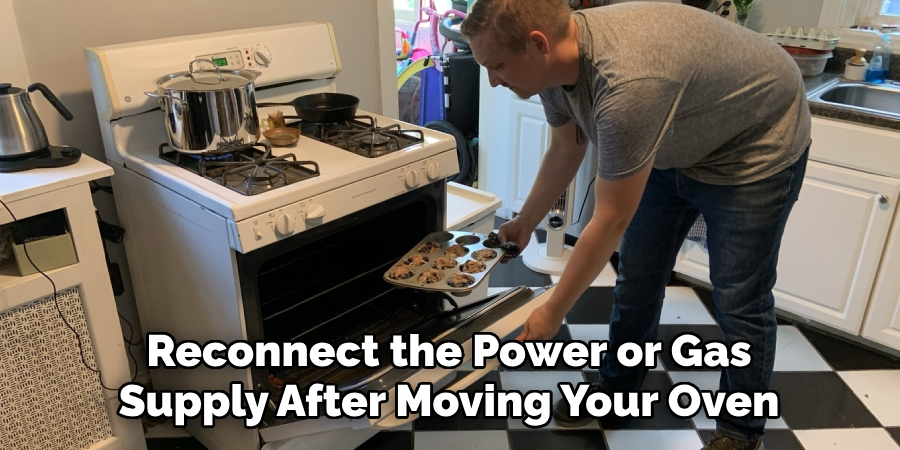
Step 10: Reconnect Power and Gas Supply (If Applicable)
Finally, if your oven was disconnected from the power or gas supply during the move, remember to reconnect it before using it again. Turn on the main power supply or open the gas valve and check that everything is working correctly.
Following these steps on how to move an oven will not only ensure a safe and successful move for your oven but also help maintain the appliance’s longevity. Remember to always read the manufacturer’s instructions before attempting to move any heavy appliances like ovens. If you are unsure or uncomfortable with moving it yourself, don’t hesitate to seek professional assistance for a stress-free and hassle-free experience. Happy moving!
Frequently Asked Questions
Q1: Can I Move a Gas Oven by Myself?
A1: It is not recommended to move a gas oven by yourself, as it involves handling gas connections that can be dangerous if not done correctly. It is best to seek professional help in this situation.
Q2: Do I Need to Disconnect My Oven Before Moving It?
A2: Yes, it is essential to disconnect the oven from the power and gas supply before moving it. This ensures the safety of both the appliance and those involved in the move.
Q3: Can I Use a Hand Truck or Dolly to Move an Oven Upstairs?
A3: Using a hand truck or dolly can make moving an oven upstairs easier, but it is crucial to ensure that you have enough support and assistance while doing so. It’s recommended to have at least two people when using a dolly for an upstairs move.
Q4: What Should I Do If I Am Unable to Reconnect the Power or Gas Supply After Moving My Oven?
A4: It is best to seek professional assistance if you are unable to reconnect the power or gas supply after moving your oven. Attempting to do it yourself may result in damage or injury.
Conclusion
Moving an oven can be a challenging task, but with the right preparation, tools, and techniques, it can be done safely and efficiently. By following the step-by-step guide on how to move an oven outlined above, you can protect both your appliance and your home from potential damage while minimizing the risk of injury.
Always prioritize safety, seek assistance when necessary, and don’t hesitate to call in professionals for particularly complex moves, such as those involving gas connections or stairs. A smooth and successful move not only ensures your oven’s functionality in its new location but also gives you peace of mind for the future.
Professional Focus
Angela Ervin, a former interior designer turned blogger, specializes in kitchen design and renovations. Through her website, she blends her passion for cooking with design expertise, sharing practical and creative ideas. Known for balancing functionality and beauty, Angela’s insightful content has made her a trusted voice in home design and lifestyle.
About the Author
Angela Ervin, an experienced interior designer and blogger, combines her passion for kitchen renovations with storytelling. Living in Petersburg with her family, she enjoys cooking and testing her projects firsthand. Known for her humor and relatable style, Angela shares creative, functional design insights through her content, making her a trusted voice in home design.
Education History
University: Virginia Commonwealth University
Degree: Bachelor of Fine Arts (BFA) in Interior Design
- Angela’s education at VCU focused on mastering core interior design principles, including spatial planning, color theory, materials selection, and sustainable design practices.
- She gained hands-on experience through studio projects and collaborative design exercises, which honed her ability to create functional and aesthetically pleasing environments.
- Her coursework also emphasized problem-solving and practical applications of design, preparing her for real-world projects like her self-directed kitchen renovations.
- The program’s strong foundation in both technical skills and creative expression shaped Angela’s ability to seamlessly integrate form and function in her work.