
Cleaning an oven caked with baked-on carbon might feel like a daunting task, but it doesn’t have to be. Over time, cooking at high temperatures leaves behind stubborn carbon deposits that can make ovens look worn-out and unhygienic. Without proper cleaning, these deposits can impact the performance of your oven and even alter the flavor of your food.
Whether you’re facing years of build-up or just want that fresh-out-of-the-box shine, the process to tackle baked-on carbon is well within your reach. Equipped with the right materials and a bit of patience, you’ll restore your oven in no time. This step-by-step guide is specifically designed for beginners and home enthusiasts, making it simple to follow along. By the end of this article, you’ll have all the tools and knowledge you need to know how to remove baked on carbon from oven effectively.
Why Cleaning Baked-On Carbon Matters
Ovens are the heart of any kitchen, and maintaining them ensures better performance and longevity. But why exactly should you care about baked-on carbon deposits?
First, heavily carbonized residue can burn during use, causing smoke, odors, and even setting off your fire alarm. This smoke introduces unwanted flavors into whatever you’re cooking, from your morning muffins to a Sunday roast. Secondly, these deposits can reduce the efficiency of your oven, making it take longer to heat, which in turn results in higher energy bills.
Regular cleaning not only keeps your food tasting as it should, but it also minimizes the risk of smoke hazards while contributing to better energy efficiency. Addressing baked-on carbon build-up also helps avoid health concerns related to prolonged exposure to burnt residues.
By tackling baked-on carbon now, you’re safeguarding both the functionality of your oven and the quality of your culinary creations.
10 Step-by-Step Guide on How to Remove Baked On Carbon From Oven
Step 1: Prepare the Oven for Cleaning
Before starting, disconnect your oven. Unplugging the appliance or shutting off the gas supply ensures a safe working environment. Next, remove all racks and trays from inside the oven so you can access all surfaces without obstructions. This first step gives you a clean slate to work on.

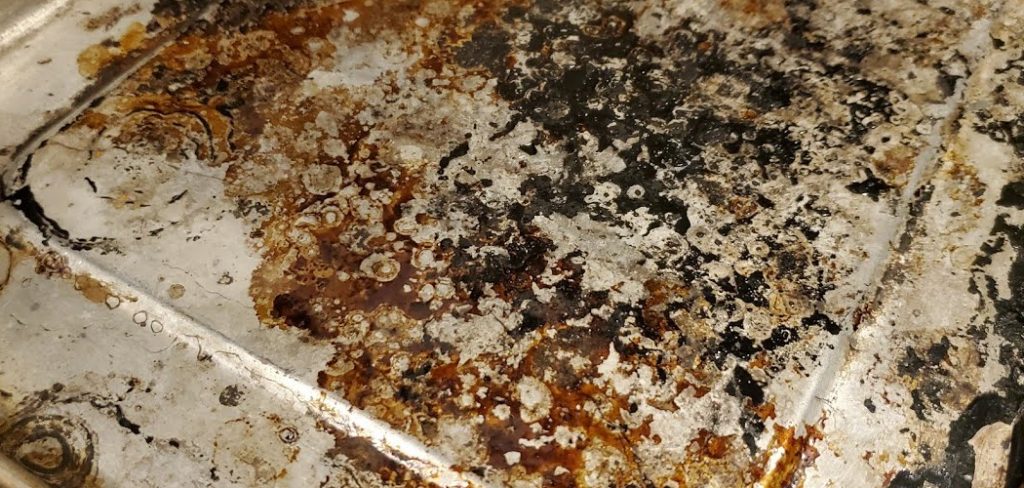
Step 2: Assess the Level of Build-Up
Examine the inside of your oven to determine the severity of the carbon deposits. Light accumulation might require minimal effort, while thicker, baked-on residue may demand more intensive cleaning techniques. Identifying the problem areas will help focus your efforts.
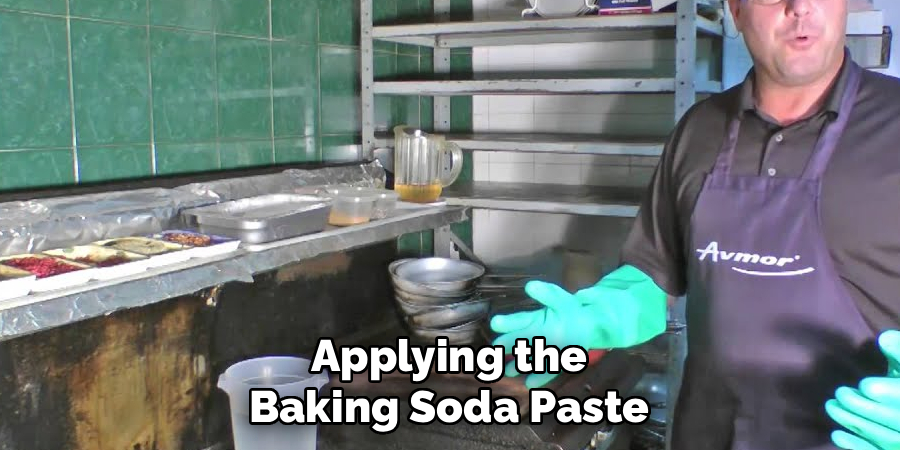
Step 3: Use a Baking Soda Paste
Create a powerful yet non-toxic cleaning paste using baking soda and water. Combine one cup of baking soda with a few tablespoons of water—enough to form a spreadable consistency. Smear this paste over the oven’s interior, paying special attention to the areas with significant carbon build-up.
Step 4: Allow the Paste to Sit
After applying the baking soda paste, leave it to sit undisturbed for 12 to 24 hours. This is essential as it gives the solution enough time to break down the tough, baked-on carbon residue. For busy schedules, this process can be completed overnight.
Step 5: Scrub Away the Baked-On Carbon
With a non-abrasive scrubbing pad, work the paste into the residue. The keyword here is patience—excessively harsh scrubbing could damage the oven’s finish. If you’re finding it difficult to remove some areas, consider softening them further using a bit of water as you scrub.
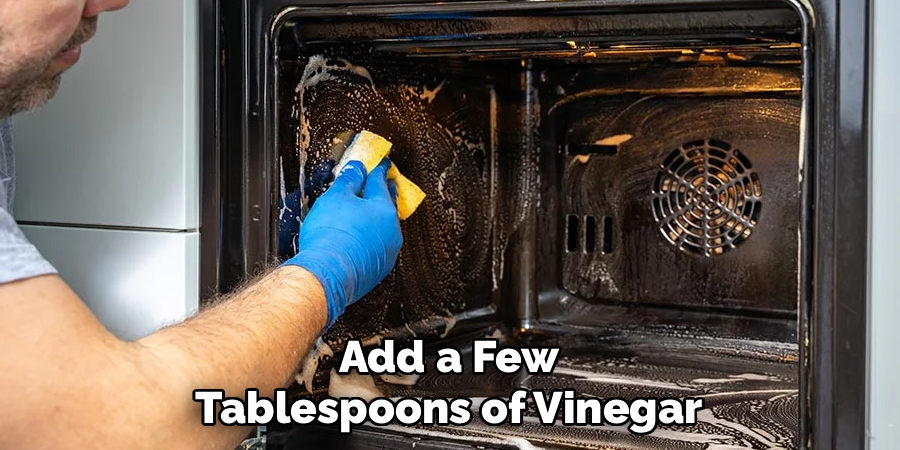
Step 6: Work on the Stubborn Spots
For persistent deposits that baking soda alone doesn’t lift, consider using white vinegar. Spray a mixture of equal parts water and vinegar directly onto the carbon spots, creating a mild fizzing reaction with any remaining paste. This added chemical combination works wonders on tougher stains.
Step 7: Wipe Down the Oven
Once the scrubbing is complete, clean up the loose debris and cleaning residues with warm water and a damp cloth. Repeat wipedowns to ensure no baking soda or carbon particles linger behind.
Step 8: Clean Oven Racks Separately
While working on the oven’s interior, don’t forget about the racks and trays. Submerge them in a sink filled with warm water and dish soap. For baked-on grime, add a few tablespoons of vinegar to the soak, and then scrub each rack with a bristled brush to remove stuck-on debris.
Step 9: Air and Dry the Oven
Give the cleaned oven interior sufficient time to air-dry before reconnecting it. This waiting period ensures no moisture gets trapped, which could interfere with its operational efficiency. It also guarantees a streak-free finish.
Step 10: Perform Routine Maintenance
After restoring your oven’s shine, protect your efforts by committing to regular maintenance. Clean small spills immediately after cooking sessions to prevent residues from turning into tough stains over time. A small effort now saves time-consuming work later.
Safety Tips for Cleaning
Turn Off Power Sources
Before cleaning any appliances, ensure they are turned off and unplugged from the power source. For gas ovens, double-check that the gas supply is securely turned off to prevent accidental leaks.
Use Proper Ventilation
When using chemical cleaners, make sure the area is well-ventilated. Open windows or turn on exhaust fans to avoid inhaling potentially harmful fumes.
Wear Protective Gear
Use gloves and, if necessary, safety goggles to protect your skin and eyes from harsh cleaning agents. This prevents irritation or injuries caused by accidental splashes or spills.

Avoid Mixing Chemicals
Never mix cleaning products, especially those containing bleach and ammonia, as this can produce toxic fumes. Stick to a single product or follow manufacturer recommendations for safe practices.
Be Cautious with Hot Surfaces
Ensure the oven or appliance has completely cooled down before beginning the cleaning process to avoid burns or accidental injuries.
Store Products Safely
Keep cleaning supplies out of reach of children and pets to prevent accidental spills or ingestion. Proper storage also prolongs the shelf life of cleaning products.
By adhering to these safety guidelines, you can clean effectively while ensuring a safe environment for yourself and others.
Tips for Oven Maintenance
Use Oven Liners
Place removable oven liners on the bottom of your oven to catch any spills or crumbs. They are easy to clean and protect the surface from buildup.
Avoid Abrasive Cleaners
When cleaning your oven, always use gentle, non-abrasive cleaners to prevent scratching the interior surfaces. A soft sponge or microfiber cloth works best.
Inspect and Replace Seals
Regularly check the oven door seals for cracks or wear. Damaged seals can lead to heat loss, making your oven less efficient. Replace them if needed.
Clean Racks Separately
Remove the oven racks and clean them with warm, soapy water. This allows you to thoroughly clean both the racks and the interior of the oven.
Perform a Deep Clean Periodically
Schedule a thorough oven cleaning every few months to tackle areas that aren’t addressed during routine maintenance. This keeps your appliance performing optimally.
Avoid Overflows
When baking or roasting, place a baking sheet under dishes that may drip or overflow to prevent spills from hardening on the oven surface.
Preheat Properly
Always allow the oven to preheat fully before cooking. This ensures an even temperature and prevents overheating the appliance unnecessarily.
Check the Ventilation
Ensure the oven’s vents are free from obstructions to allow proper airflow. This also helps your food cook evenly.
By incorporating these simple practices, you can extend the lifespan of your oven and keep it functioning at peak efficiency.
Frequently Asked Questions Section
How often should I clean baked-on carbon from my oven?
It depends on how frequently you use your oven. Heavy use calls for a deep cleaning every 2-3 months, while lighter use might allow for a twice-a-year schedule. However, spills from foods like cheese or sauces should be cleaned as soon as possible to prevent them from baking on.
Are commercial oven cleaners safe for tackling baked-on carbon?
Commercial oven cleaners can be effective but may contain harsh chemicals like lye that are potentially harmful to the user and the material. Always read the instructions carefully, use gloves, and ventilate the area. Alternatively, natural solutions like baking soda and vinegar provide a safer, cost-effective option.
Can I use a self-cleaning mode to remove baked-on carbon?
Yes, self-cleaning functions are designed to handle this task. However, they work by heating the oven to extremely high temperatures, reducing carbon deposits to ash. While effective, this method should be used sparingly as it can put stress on the oven’s components and may emit unpleasant odors.
What if I accidentally scratch the oven while scrubbing?
Minor scratches can occur if abrasive materials are used to clean the oven. Stick to non-abrasive sponges, brushes, and soft cloths. If scratches occur, they are typically cosmetic and won’t affect functionality. Future cleanings should use gentler methods to avoid worsening the damage.
Can I prevent baked-on carbon in the first place?
Absolutely. Lining your oven racks with aluminum foil or using oven liners can catch spills before they become a problem. Additionally, cleaning up as soon as spills occur and avoiding high-heat cooking for excessively greasy foods will help keep carbon deposits at bay.
Conclusion
Removing baked-on carbon from your oven is not as complicated as it might seem at first glance. With a combination of simple cleaning solutions and some elbow grease, your oven can look as good as new. Regular maintenance not only prevents build-up but also contributes to better cooking results and a safer kitchen environment.
Taking the time to care for your kitchen appliances can significantly extend their lifespan and ensure optimal performance. By incorporating consistent cleaning practices and addressing minor issues promptly, you can create a more enjoyable cooking experience and maintain a hygienic cooking space.
Now that you know how to remove baked on carbon from oven, it’s time to roll up your sleeves and give your kitchen centerpiece the care it deserves. Enjoy the satisfaction of turning a stubbornly grimy appliance into a brilliantly clean one!
Professional Focus
Angela Ervin, a former interior designer turned blogger, specializes in kitchen design and renovations. Through her website, she blends her passion for cooking with design expertise, sharing practical and creative ideas. Known for balancing functionality and beauty, Angela’s insightful content has made her a trusted voice in home design and lifestyle.
About the Author
Angela Ervin, an experienced interior designer and blogger, combines her passion for kitchen renovations with storytelling. Living in Petersburg with her family, she enjoys cooking and testing her projects firsthand. Known for her humor and relatable style, Angela shares creative, functional design insights through her content, making her a trusted voice in home design.
Education History
University: Virginia Commonwealth University
Degree: Bachelor of Fine Arts (BFA) in Interior Design
- Angela’s education at VCU focused on mastering core interior design principles, including spatial planning, color theory, materials selection, and sustainable design practices.
- She gained hands-on experience through studio projects and collaborative design exercises, which honed her ability to create functional and aesthetically pleasing environments.
- Her coursework also emphasized problem-solving and practical applications of design, preparing her for real-world projects like her self-directed kitchen renovations.
- The program’s strong foundation in both technical skills and creative expression shaped Angela’s ability to seamlessly integrate form and function in her work.