
Removing a kitchen tile countertop can seem like a daunting task, but with the right tools and preparation, the process becomes much more manageable. Whether you’re updating your kitchen’s style or replacing damaged tiles, understanding the steps involved will help you complete the project efficiently and safely.

This guide on how to remove kitchen tile countertop will walk you through the essential steps to remove a kitchen tile countertop, ensuring a smooth demolition process while avoiding unnecessary damage to surrounding areas.
Why Remove Your Kitchen Tile Countertop?
The decision to remove your kitchen tile countertop may be based on various reasons such as wanting to update your kitchen’s aesthetic, replacing damaged or outdated tiles, or simply preparing for a new countertop installation. Regardless of the reason, the process remains relatively similar.
However, it’s crucial to assess the condition of your kitchen tile countertop before proceeding with removal. If there are any signs of water damage or mold growth, it’s best to consult a professional for proper removal methods. Additionally, if you’re planning on reusing the same tiles for your new countertop, be sure to handle them carefully during removal to avoid any unnecessary breakage.
Tools and Materials Required
Before getting started, make sure you have all the necessary tools and materials ready for the project. Here is a list of items you will need:
Safety Equipment:
- Safety Glasses
- Dust Mask
- Work Gloves
Tools:
- Hammer
- Pry Bar
- Chisel
- Utility Knife
Materials:
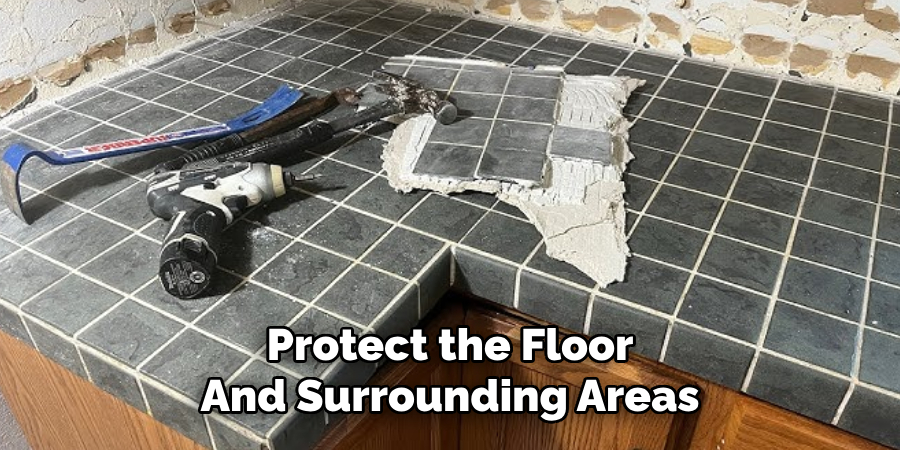
- Drop Cloth or Tarp to Protect the Floor and Surrounding Areas
- Plastic Bags for Tile and Debris Disposal
- Painter’s Tape (optional)
8 Step-by-step Guides on How to Remove Kitchen Tile Countertop
Step 1: Prepare the Area
Before beginning the removal process, it’s important to prepare the area to ensure safety and minimize damage to the surrounding space. Start by clearing your countertops completely removing any appliances, utensils, or decorations that could get in the way. Next, use drop cloths or tarps to protect your cabinets, floors, and nearby surfaces from dust and debris during the demolition.
You may also want to use painter’s tape to cover and shield edges or areas that you want to keep intact. Once the area is prepped, make sure to put on your safety glasses, dust mask, and work gloves to protect yourself during the project. Taking the time to properly prepare will help ensure an efficient and clean removal process.
Step 2: Remove the Caulking
The next step in removing your kitchen tile countertop is to carefully remove the caulking along the edges of the countertop. Start by using a utility knife to cut through the caulking where the countertop meets the backsplash, walls, or any adjacent surfaces. Hold the knife at a slight angle and make slow, steady cuts to avoid damaging the surrounding areas.
Once the caulking has been cut, use a putty knife or chisel to gently scrape away any remaining residue. If the caulking is particularly stubborn, applying a caulk softener and allowing it to sit as per the product’s instructions can make the job easier. Make sure to remove the caulking fully to loosen the edges of the countertop and ensure a smoother tile removal process.
Step 3: Loosen and Remove Tiles
With the caulking removed, the next step is to loosen and remove the tiles from the countertop. Start by identifying a loose or damaged tile, if possible, as this can make the process easier. Use a chisel and hammer to gently tap under the edge of the tile at an angle. Apply steady pressure to carefully pry the tile away from the adhesive or mortar beneath it.

If the tiles are firmly attached, you can use the hammer to lightly break a tile in the middle of the countertop, creating a starting point for removal. Be sure to wear safety glasses and work gloves to protect yourself from sharp edges or flying debris during this process. Continue using the chisel and hammer to carefully loosen and remove the remaining tiles from the countertop.
Step 4: Remove Adhesive or Mortar
Once all the tiles have been removed from the countertop, adhesive or mortar residue will likely be left behind. This can be scraped off with a chisel, putty knife, or scraper. Hold the tool at a slight angle and use gentle but firm pressure to scrape away any remaining adhesive or mortar.
If you’re planning on reusing your old tiles for your new countertop, take extra care not to damage them during this step. Once all the adhesive has been removed, wipe down the surface with a damp cloth to ensure all residue has been cleared.
Step 5: Disconnect Sink and Faucet (if applicable)
If your kitchen tile countertop has a sink or faucet attached, you will need to disconnect them before removing the countertop. Start by turning off the water supply valves located under the sink. Then, use an adjustable wrench to disconnect the water supply lines from the faucet.
Next, remove any mounting clips that are holding the sink in place. Once disconnected, carefully lift and remove the sink from its position on top of the countertop. If your countertop is adhered to a plywood base, you can also unscrew and remove any screws securing it in place.
Step 6: Break and Remove the Countertop
With the sink and faucet removed, you can now focus on removing the entire countertop from its base. Start by breaking up any large pieces of tile or stone using a hammer. Be sure to wear safety glasses and gloves during this step to protect yourself from flying debris. Once broken, carefully lift and remove each section of the countertop.
If your kitchen tile countertop is adhered to a plywood base, use a chisel or pry bar to gently loosen and remove it. Take care not to damage the surrounding areas as you lift it off the base.
Step 7: Clean Up Any Debris
Once the countertop has been completely removed, it’s essential to clean up any debris left behind. Start by collecting all the broken tiles, adhesive, and other waste materials and place them in heavy-duty plastic bags for disposal. Use a broom or vacuum to sweep up smaller debris and dust from the workspace, ensuring no sharp objects or remnants are left on the floor.

If adhesive or mortar residue is still present on surfaces, use a damp cloth or sponge to wipe it away, allowing the area to dry completely. Taking the time to thoroughly clean the workspace will not only make it safer but also prepare the area for any further renovations or installations.
Step 8: Dispose of Debris
Properly disposing of the debris from your kitchen tile countertop removal is an important final step. Begin by ensuring all sharp objects, such as tile fragments and broken materials, are securely contained in heavy-duty plastic bags to prevent injury. Check with your local waste disposal regulations to determine the appropriate method for disposal, as some materials, such as mortar or tile, may require special handling or need to be taken to a designated waste facility.
For larger volumes of debris, consider renting a dumpster or taking the waste directly to a dump site. Alternatively, if you’re working with a contractor, they may offer debris removal services as part of the project. Recycling should also be considered, as some materials may be eligible for reuse in construction or art projects. By disposing of the debris responsibly, you contribute to a cleaner and safer environment while completing your renovation efficiently.
Additional Tips
- If possible, work with a partner to make the removal process easier and safer.
- Use protective gear, such as safety glasses and gloves, to prevent injury during the removal process.
- Take breaks as needed to avoid fatigue or strain on your body.
- If you encounter any unexpected challenges or difficulties during the removal process, consult a professional for assistance.
- Properly dispose of all hazardous materials and debris to protect yourself and the environment.
- Consider donating gently used tiles or other materials to local charities or organizations in need.
By following these steps and tips on how to remove kitchen tile countertop, you can safely and effectively remove your old kitchen tile countertop, preparing it for a new and improved surface. Remember to take care during each step and seek professional help if needed.

Conclusion
Removing a kitchen tile countertop can be a time-consuming and labor-intensive process. However, with the right tools and techniques, it can be accomplished successfully without causing damage to surrounding areas or yourself. Remember to take proper safety precautions throughout the removal process and dispose of debris responsibly.
Once the old countertop is removed, you’ll have a blank canvas ready for new renovations and upgrades that will transform your kitchen into a beautiful and functional space. So roll up your sleeves, grab your tools, and get ready to remove that old tile countertop! The end result will be worth the effort. Thanks for reading this article on how to remove kitchen tile countertop.
Professional Focus
Angela Ervin, a former interior designer turned blogger, specializes in kitchen design and renovations. Through her website, she blends her passion for cooking with design expertise, sharing practical and creative ideas. Known for balancing functionality and beauty, Angela’s insightful content has made her a trusted voice in home design and lifestyle.
About the Author
Angela Ervin, an experienced interior designer and blogger, combines her passion for kitchen renovations with storytelling. Living in Petersburg with her family, she enjoys cooking and testing her projects firsthand. Known for her humor and relatable style, Angela shares creative, functional design insights through her content, making her a trusted voice in home design.
Education History
University: Virginia Commonwealth University
Degree: Bachelor of Fine Arts (BFA) in Interior Design
- Angela’s education at VCU focused on mastering core interior design principles, including spatial planning, color theory, materials selection, and sustainable design practices.
- She gained hands-on experience through studio projects and collaborative design exercises, which honed her ability to create functional and aesthetically pleasing environments.
- Her coursework also emphasized problem-solving and practical applications of design, preparing her for real-world projects like her self-directed kitchen renovations.
- The program’s strong foundation in both technical skills and creative expression shaped Angela’s ability to seamlessly integrate form and function in her work.