
If you’re wondering how to remove oven shelf supports, you’re not alone. These supports can develop buildups of grease and grime over time, making them not just unsightly but difficult to maintain. Additionally, some oven-cleaning tasks—such as running a self-cleaning cycle—might require the shelf supports to be removed first. Understanding the proper techniques for removing and reattaching them is crucial to avoid causing damage and to keep your oven in top shape.
Before starting, make sure the oven is completely cool and that you have a soft cloth or gloves to protect your hands. Locate the attachment points of the supports, usually at the sides of the oven’s interior. Gently lift or unhook the support bars according to the manufacturer’s guidelines.
Avoid using excessive force, as this may bend or damage the metal. Once removed, the supports can be cleaned using warm, soapy water and a non-abrasive sponge. Allow them to dry completely before reinstalling to prevent moisture buildup inside the oven. Always consult your oven’s manual for specific instructions tailored to your model.
This guide walks you through everything you need to know, including a step-by-step process specifically tailored for beginner DIYers. Keep reading to learn how you can safely and efficiently handle this task, saving yourself time and frustration.
Why Knowing How to Remove Oven Shelf Supports Matters
Removing oven shelf supports might not seem like a big deal until you actually need to do it. Cleaning your oven thoroughly requires access to the interior walls, which can be obstructed by these components. Furthermore, damaged or improperly reattached supports can lead to uneven baking or even costly repairs.
Before starting, ensure you have the necessary tools and a safe working environment. Most oven shelf supports are designed to be removed without excessive force, but applying the wrong technique could lead to damage. Always refer to your oven’s user manual for specific instructions.
Begin by allowing the oven to cool completely to avoid burns. Next, identify how the supports are attached—some may have screws, while others might simply slot into place. Carefully loosen or unclip the supports, keeping track of any hardware for reassembly. Taking your time during this process will prevent unnecessary damage to your oven’s components.
By becoming familiar with the process, you give yourself the tools to care for your appliance properly. This knowledge not only ensures better hygiene but also extends the life of your oven. Plus, once you know how to do it, routine cleaning or occasional adjustments (such as tightening or replacing loose supports) become much less intimidating.
9 Step-by-Step Guide to Remove Oven Shelf Supports
When you’re learning how to remove oven shelf supports, following a structured process is key. Most ovens have similar designs, but there may be small variations depending on the brand or model. Below is a step-by-step guide to help you get the job done right.
Step 1: Prepare the Oven for Safe Handling
Before you even think about removing the supports, ensure the oven is completely cool. Working on a hot oven poses safety risks, including burns. Turn off the appliance at the power source to be extra cautious. Remove the oven’s racks to gain easier access to the supports.
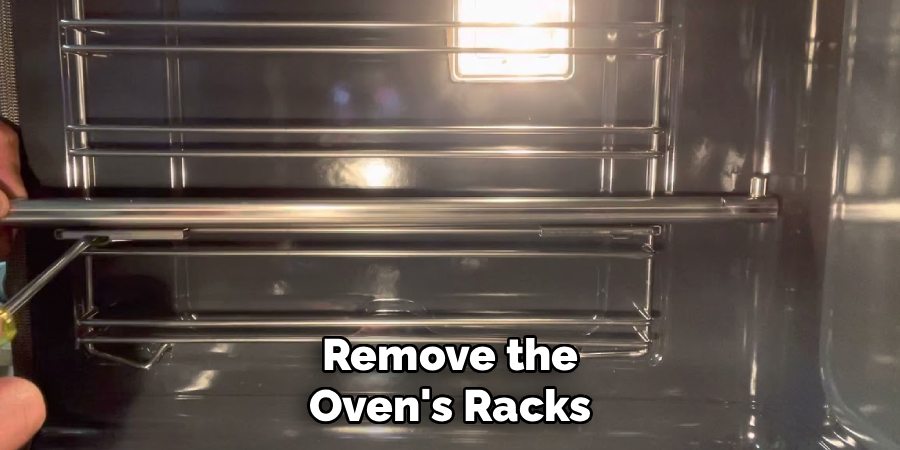
Having a soft cloth or towel nearby will also help protect your hands and the oven’s surface during the process.
Step 2: Identify the Shelf Supports and Their Mechanism
Locate the oven shelf supports inside the chamber. Typically, these supports are attached to the walls along grooves or slots. Check for screws, clips, or latches securing them in place. The method used to hold the supports will vary slightly depending on the design of your oven.
Some supports may even come with a spring mechanism, so it’s essential to understand what you’re working with before beginning any removal steps.
Step 3: Release Any Clips or Locks
Depending on your oven model, shelf supports may be attached using locking clips. Examine their position carefully—they are usually located at key attachment points near the top or bottom of the supports. Use your hands or a screwdriver to gently release these clips, being careful not to apply too much force or damage the mechanism.
If the clips are stiff due to grime or residue, a spritz of kitchen-safe degreaser can help loosen them.
Step 4: Slide or Tilt the Supports Out
Once unlocked, you might need to slide or tilt the supports to remove them from their fittings. Start at the top end and gently work your way downward while holding the supports firmly to avoid scraping the oven walls.
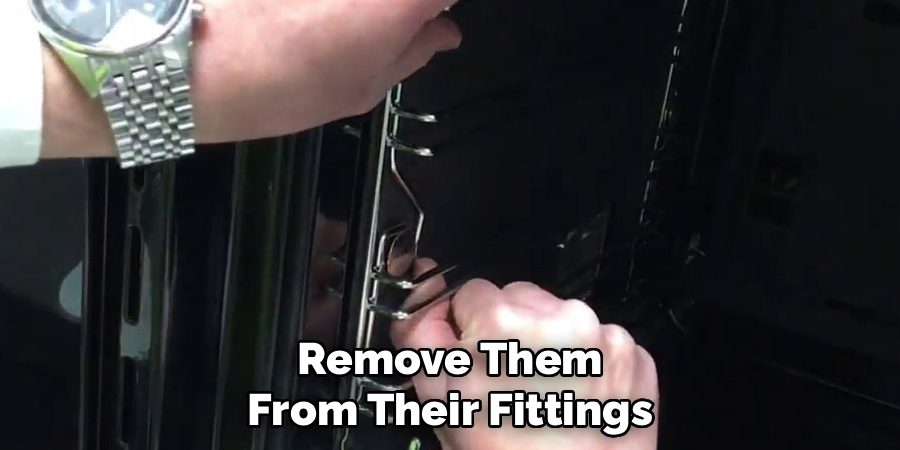
If they resist, double-check that all attachments—such as screws or latches—are fully loosened and disengaged.
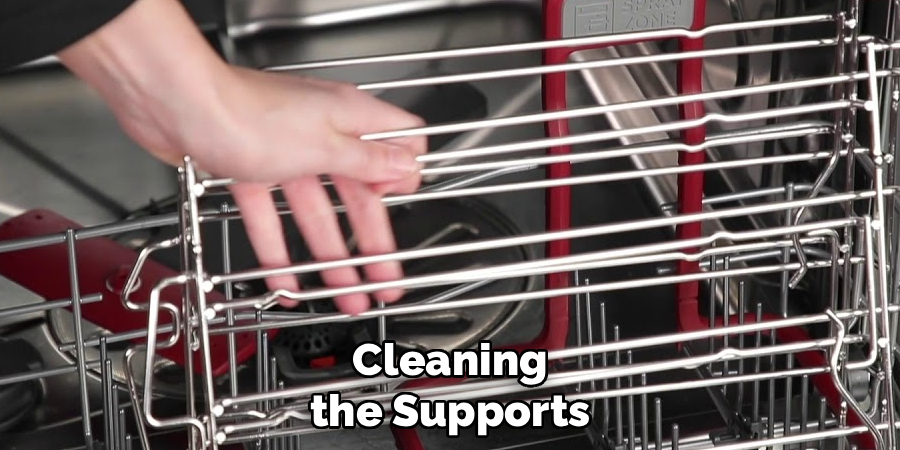
Step 5: Clean the Removed Shelf Supports
With the supports out of the oven, use warm soapy water and a soft-bristle brush to remove any grease, stains, or burnt-on debris. Avoid harsh scrubbing tools, as these can damage the surface of the supports. Dry thoroughly with a clean cloth before proceeding to reinstall.
Step 6: Inspect the Attachment Points
While the supports are removed, take time to inspect the grooves, clips, or screws they sit in. Dirt or damage in these areas might complicate reinstallation. Use a vacuum or a damp cloth to clean out excess residue, ensuring a snug and secure fit when the time comes to reattach the supports.
Step 7: Reinstall the Shelf Supports
To put the supports back in, start at the bottom attachment point, carefully sliding or fitting the supports into place. Gradually align them with the upper slots or grooves while ensuring everything fits snugly. If your supports include locking clips, secure them firmly in their respective positions.
Test the stability by giving the supports a gentle nudge to check for any movement. Also, verify that oven racks slide smoothly into the reinstated supports.
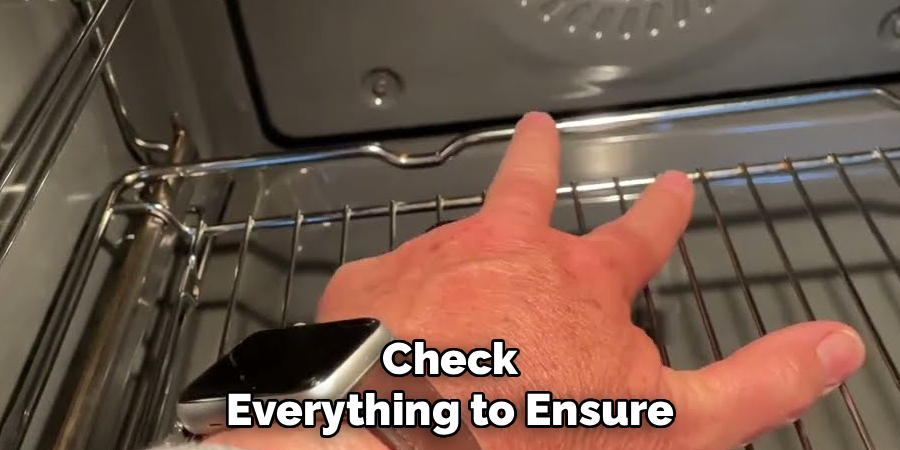
Step 8: Restore Power to the Oven
Once reinstalled, double-check everything to ensure the supports are fitted correctly. Restore the power to the oven and, if necessary, test functionality by heating the appliance briefly. Confirm that the reattached supports remain stable under typical oven conditions.
Step 9: Perform Routine Maintenance
Make it a habit to clean your oven shelf supports regularly. Frequent cleaning prevents grease buildup, making future removal and reinstallation faster and easier. For long-term maintenance, consider using oven liners to catch spills before they become baked-on grime.
Benefits of Regular Maintenance
- Extended Lifespan: Regular maintenance helps to prevent wear and tear, ensuring your oven remains functional for many years.
- Improved Efficiency: A well-maintained oven heats more evenly and uses energy more effectively, saving both time and utility costs.
- Enhanced Safety: Keeping the oven clean reduces fire hazards caused by grease and food debris.
- Better Cooking Results: A clean oven provides consistent heating, leading to perfectly cooked meals.
- Ease of Use: Routine care prevents the buildup of grime, making the oven easier to operate and clean over time.
Frequently Asked Questions About How to Remove Oven Shelf Supports
1. Why Do You Need to Remove Oven Shelf Supports?
Removing shelf supports allows you to clean behind them and access areas of the oven you can’t reach otherwise. It is also essential before using certain cleaning modes, such as the self-clean cycle, which could damage the supports if left in place.
2. Can All Oven Supports Be Removed?
Most oven shelf supports are designed to be removable, but the method varies by model. It’s a good idea to consult your oven’s user manual to confirm whether the supports can be safely detached and what tools—if any—are required.
3. What Should I Do If the Shelf Supports Are Stuck?
If the supports feel stuck, avoid forcing them. Check for grime or rust that might be causing the problem. Using a kitchen-safe lubricant or degreaser can help loosen the attachments. Make sure all locks, clips, or screws are disengaged before trying again.
4. How Often Should You Clean Oven Shelf Supports?
Cleaning the supports at least every two months is recommended, depending on how frequently you use your oven. Regular maintenance prevents grease and dirt buildup, saving you significant effort during more thorough cleans.
5. What Tools Are Typically Required for This Process?
For most ovens, removal can be done by hand. However, some models may require basic tools like a screwdriver to loosen screws or clips. Always check your oven’s manual before beginning to ensure that you have everything you might need.
Conclusion
Learning how to remove oven shelf supports is an essential skill for keeping your oven in great condition. By following these simple yet detailed steps, you can tackle cleaning, maintenance, or replacements with confidence.
Keeping your oven clean and well-maintained not only ensures better cooking results but also extends the appliance’s lifespan. Regularly inspecting and cleaning all removable parts, including the shelf supports, helps prevent grease buildup and ensures your oven operates efficiently. Proper care and attention can make a significant difference in the performance and durability of your kitchen equipment.
Properly maintained supports not only improve the functionality of your oven but also ensure a cleaner cooking environment. Now that you’ve got this process down, don’t hesitate to give it a try yourself—your kitchen (and meals) will thank you!
Professional Focus
Angela Ervin, a former interior designer turned blogger, specializes in kitchen design and renovations. Through her website, she blends her passion for cooking with design expertise, sharing practical and creative ideas. Known for balancing functionality and beauty, Angela’s insightful content has made her a trusted voice in home design and lifestyle.
About the Author
Angela Ervin, an experienced interior designer and blogger, combines her passion for kitchen renovations with storytelling. Living in Petersburg with her family, she enjoys cooking and testing her projects firsthand. Known for her humor and relatable style, Angela shares creative, functional design insights through her content, making her a trusted voice in home design.
Education History
University: Virginia Commonwealth University
Degree: Bachelor of Fine Arts (BFA) in Interior Design
- Angela’s education at VCU focused on mastering core interior design principles, including spatial planning, color theory, materials selection, and sustainable design practices.
- She gained hands-on experience through studio projects and collaborative design exercises, which honed her ability to create functional and aesthetically pleasing environments.
- Her coursework also emphasized problem-solving and practical applications of design, preparing her for real-world projects like her self-directed kitchen renovations.
- The program’s strong foundation in both technical skills and creative expression shaped Angela’s ability to seamlessly integrate form and function in her work.